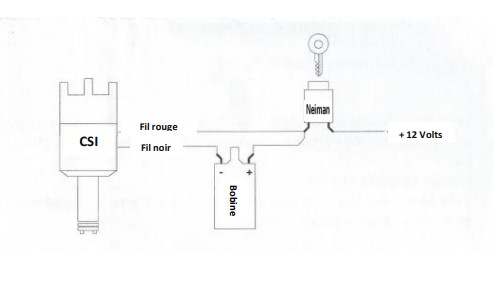
Check the resistor value of the ignition coil. For 12 volt ignition coil more than 2.5 ohm. If the resistor value is too low it can cause overheating and/or damage the CSI. It is recommended that you use a Lucas DLB 105.
It is recommended to use HT silicon leads (with resistance of at least 2 K ohm). If you want to use copper leads, always use resistor spark plugs (with resistance of at least 2 K ohm).
With the existing distributor still in place set the static adjustment at 10 degrees BTDC using the original timing marks from flywheel or crankshaft pulley, making sure that the rotor arm points to the number one spark plug. For a further check that the engine is at TDC on number one cylinder you will be able to insert feeler gauges for both valves.
Retirer le distributeur d’origine et installer le CSI.
Disconnect all wires of the ignition coil. Determine the 12 volt power supply wire and connect it to the + contact of the ignition coil together with the RED wire of the CSI. Do not connect the wires yet. If the 12 volt supply is connected directly to the black wire the distributor will not work and may be irreparably damaged!
Turn the ignition on (do not start the car).
Turn the CSI to the left until the led flashes; the number of times that the led flashed is the curve number that it is currently set to.
Adjust with the help of a small Philips screwdriver to the right curve (see table).
Slowly turn the CSI distributor to the right (clockwise) until the blue led lights continuously. The CSI is now adjusted to the static adjustment point. Tighten the CSI.
Turn off the ignition and connect the black wire to the negative contact of the ignition coil.
Assemble the distributor cap and connect the ignition cable, watch the order and keep the high voltage cables as far away as possible from the other cables (to prevent interference).
Put the car into neutral and start the engine.
If you are using a tachometer, this can now also be connected to the black wire.
Check the adjustment with the help of a stroboscope and check that it is set on 10 degrees.
